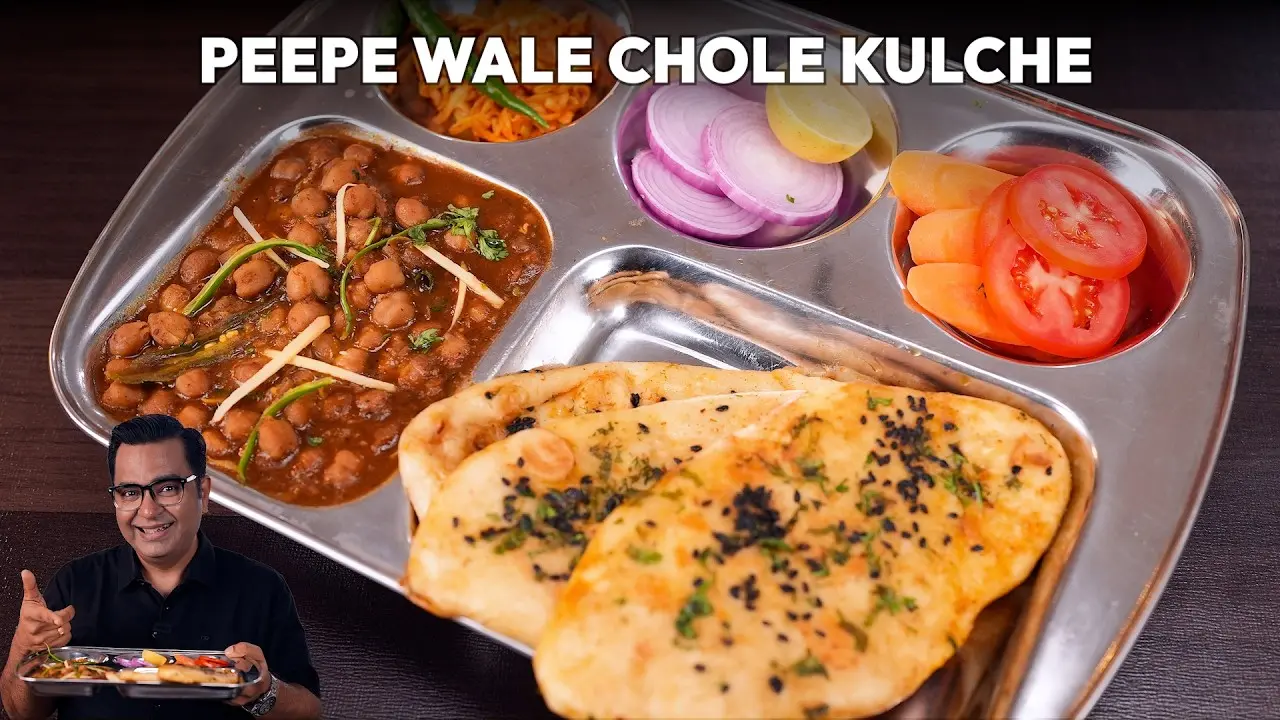
Peepe Wale Chole Kulche | Delhi Street Style Chatpata Chole

60 Mins

3-4 People

3 hrs
Delhi's Most Iconic Street Food — Peepé Wale Chole Kulche
Did you know that the real secret behind Delhi's famous Peepé Wale Chole Kulche is not just the spices — it is the technique? The chole are cooked in tea water which gives them that deep, dark colour you see on the streets of Delhi, and the kulche are dipped straight into the chole gravy before being toasted on the tawa with ghee. That one step changes everything. I am telling you, the moment you do that, you will understand what all the fuss is about.
Today I am bringing you this exact recipe — Delhi street style Peepé Wale Chole Kulche, made the right way. The chole are rich, chatpata, and full of bold spice, and the kulche are soft, slightly charred, and soaked in all that flavour. And the best part? I am also showing you a new way to finish the kulche — dipped in chole, toasted on a hot tawa, topped with fresh coriander. Ay hay hay, what a combination this is going to be.
Ingredients of Peepé Wale Chole Kulche
Servings: 3–4 people
Preparation Time: 3 hours
Cooking Time: 60 minutes
For the Chole:
- Oil – 2 tbsp
- Onion paste – 2–3 pieces
- Cloves – 7–8 pieces
- Black cardamom – 2 pieces
- Cinnamon – 1 inch
- Ginger paste – ½ tbsp
- Fresh tomato puree – 3 pieces
- Salt – 1 tsp
- Chole masala – 1 tsp
- Turmeric powder – ½ tsp
- Red chilli powder – ½ tsp
- Dried pomegranate powder (anardana) – 1 tsp
- Coriander powder – 1 tsp
- Water – a splash
- Soaked kabuli chana – 3 cups
- Baking soda – ½ tsp
- Tea water – as required
- Ghee – 2 tbsp
- Ginger juliennes – ½ inch
- Green chilli juliennes – 2 pieces
- Fresh coriander, chopped – 1 tbsp
For the Kulcha Dough:
- Refined flour (maida) – 1 cup
- Yeast – ½ tsp
- Sugar – 1 tsp
- Curd – 2 tbsp
- Water – as required
For Kulcha Topping:
- Kalonji (nigella seeds) – as needed
- Fresh coriander, chopped – as needed
- Water – a splash (to help toppings stick)
Instructions for Peepé Wale Chole Kulche
Step 1: Preparing the Chole Base
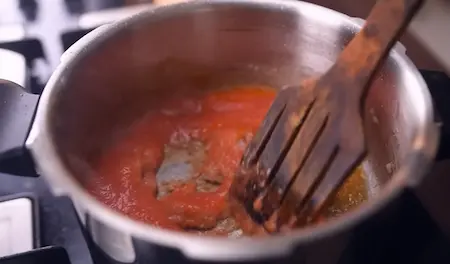
Heat oil in a pressure cooker on medium flame. Now add the onion paste — and here is an important thing to remember. Do not rush this step. Sauté the onion paste for 4 to 5 minutes on medium flame until it turns a light golden brown. The raw smell of the onion must be completely cooked out before you add anything else. Once the onion paste is cooking and starting to colour, add the cloves, black cardamom, and cinnamon so they release their aroma directly into the hot oil and onion base. Once the onion paste is properly cooked, add the ginger paste and sauté until the raw smell disappears. Now add the fresh tomato puree and cook everything together, stirring regularly, until the masala thickens properly and you can see the oil starting to separate from the sides. This is when you know the base is ready.
Step 2: Adding Spices and Chole
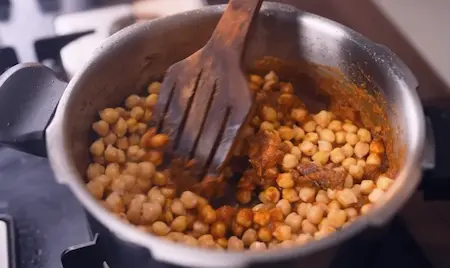
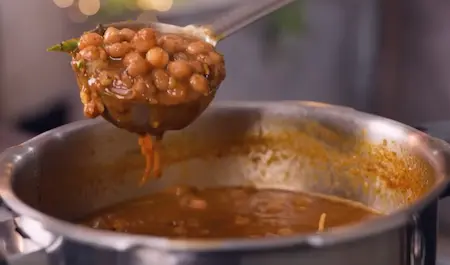
Now add all the dry spices — salt, chole masala, turmeric powder, red chilli powder, dried pomegranate powder (anardana), and coriander powder. Mix everything well on low flame. Add a small splash of water to prevent the masala from burning and cook until it smells aromatic and the spices are properly roasted. Now add the soaked kabuli chana directly into this masala and mix thoroughly so every chickpea is well coated with the masala. Add the baking soda and then pour in the tea water — this is the step that gives Peepé Wale Chole Kulche their characteristic dark, street-style colour and that extra depth of flavour. Give everything a good stir so it all comes together.
Step 3: Pressure Cooking the Chole
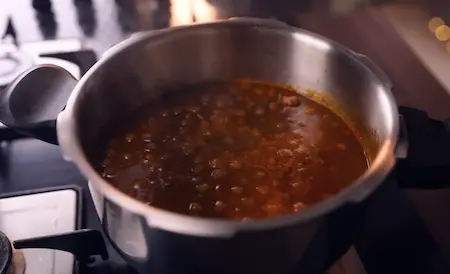
Close the lid of the pressure cooker and cook on medium flame for 4 to 5 whistles. Because the masala already has tomato in it, the chole need those extra whistles to become fully soft. After 5 whistles, let the pressure release naturally before opening. The chole should be completely soft and well cooked. The gravy should be thick and slightly coarse — not too watery. That thick, clingy texture is exactly what makes the chole perfect for dipping the kulche into.
Step 4: Final Tadka Finish
Now for the final tadka that brings the Peepé Wale Chole Kulche to life. Heat ghee in a small tadka pan. Add the ginger juliennes and green chilli juliennes and sauté them briefly until they are fragrant and aromatic — just a minute or so. Pour this hot ghee tadka directly over the cooked chole and immediately cover the pot with a lid to trap all that flavour inside. Let it sit covered for a minute. Then open, add freshly chopped coriander, and your chole are done.
Step 5: Preparing the Kulcha
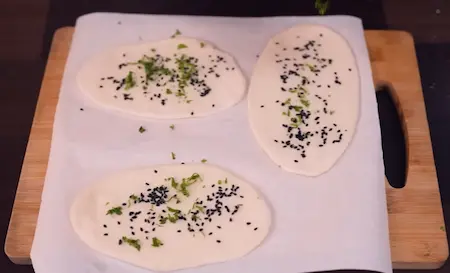
Take your prepared kulcha dough — it should have risen well by now. Knock it back to release all the air and divide it into small, even dough balls. Roll each portion out into an oblong shape — you can also roll them round, totally your choice. Apply a little water on the surface of the rolled kulcha and sprinkle kalonji and freshly chopped coriander on top. Press them lightly with your fingers so the toppings stick properly. Now cover them with a muslin cloth and let them rest for 15 to 20 minutes. This second proofing is important — it allows the kulche to puff back up and develop that soft, airy, layered texture inside before they hit the tawa.
Step 6: Cooking the Kulcha
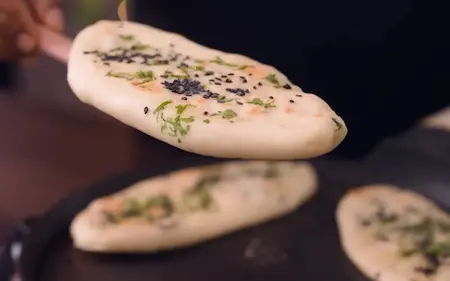
Heat a flat tawa on medium-high flame. Place the kulcha on the hot dry tawa — no oil at this stage. Apply a splash of water on the top side of the kulcha and immediately cover with a lid. The steam trapped inside will help the kulcha cook through from the inside. After a minute or so, flip the kulcha and cook the other side until you see light golden spots appearing and the kulcha feels soft but slightly crisp on the outside. You can apply a little butter or ghee at this stage if you like, for extra richness.
Step 7: Final Street Style Serving Finish
This is the step that makes Peepé Wale Chole Kulche truly authentic — the step that sets this apart from every regular chole kulche you have ever had. Take a piece of the cooked kulcha and dip it lightly into the chole gravy so it soaks up all that masala and tari. Then place it back on the hot tawa for just a minute to heat through. That kulche — soaked in the rich, spiced chole gravy and then toasted — is exactly the kind of bite you get from a street-side peepe wala in Delhi. Now serve immediately. Plate the chole hot, place the kulche alongside, and top with sliced onions and green chillies. The chole should be spicy, tangy, and robust, and the kulche should be soft and fluffy, soaking up all those rich, bold flavours. Ab samajh aaya? Yeh hai asli Peepé Wale Chole Kulche.

About This Peepé Wale Chole Kulche Recipe
The first and most important thing about this Peepé Wale Chole Kulche recipe is that the chickpeas must be soaked overnight. This is not optional. Only when the chole are soaked properly overnight will they cook through evenly, become soft all the way inside, and absorb the masala the right way. I always keep my chole soaked the night before — and you should too.
The base of the chole starts with an onion paste — not chopped onion, paste. And I make sure to cook that onion paste for 4 to 5 full minutes before adding any whole spices. Why? Because the raw smell of the onion has to be completely cooked out first. Only then do the cloves, black cardamom, and cinnamon go in — followed by ginger paste and tomato paste. Everything gets roasted together until the moisture is almost completely gone.
Then come the dry spices — salt, chole masala, turmeric, red chilli powder, anardana powder, and coriander powder. After the spices, the soaked chole go straight into the masala — no pre-boiling, no separate pot. They cook together with everything in the pressure cooker, along with a big pour of hot tea water and a pinch of baking soda. Because tomato is already in the pot, I give them five whistles instead of the usual three to four. The result is perfectly soft, deeply flavoured chole.
The kulche dough needs its time too. After the first rise, you knock it back, shape it into small dough balls, roll them out, top them with kalonji and fresh coriander, and then let them proof again for 15 to 20 minutes. That second rest is what gives the kulche their beautiful internal structure — that soft, layered, slightly chewy texture with the little air pockets inside. Then they go onto a hot dry tawa, covered with a lid, and steamed from the inside with just a splash of water. No oil at this stage.
And then comes the finish that makes Peepé Wale Chole Kulche truly special. You take the hot kulche, dip them straight into the chole gravy so they soak up all that masala, put them back on the hot tawa, and toast them. A little fresh coriander on top, and it is done. That is exactly how it is served on the streets of Delhi — and now you can make it at home too.
Cooking Tips for the Best Peepé Wale Chole Kulche
Always soak the chole overnight. This is the most important step for Peepé Wale Chole Kulche. Chole that have not been soaked long enough will not cook evenly and will take much longer in the pressure cooker. Overnight soaking is non-negotiable.
Cook the onion paste before adding whole spices. Most people add everything together at the start, but that is not the right way. Cook the onion paste for 4 to 5 minutes first so the raw smell is completely gone. Then add your whole spices — cloves, black cardamom, cinnamon. This order of cooking makes a big difference to the final flavour.
Cook out all the moisture before adding dry spices. After adding the ginger paste and tomato paste, keep cooking on medium flame until the moisture is almost completely dried out. Only then add the dry spices. This ensures the masala is properly roasted and not raw-tasting.
Use hot tea water for the chole. This is the trick that gives Peepé Wale Chole their characteristic dark colour and a subtle depth of flavour. Regular plain water will not give you the same result.
Give five whistles, not three. Because the masala already has tomato in it, the chole need one or two extra whistles to become fully soft. Five whistles will give you perfectly cooked, melt-in-the-mouth chole.
Let the kulche proof twice. Once after making the dough and once after rolling. That second 15 to 20 minute rest after rolling is what makes the kulche puff up beautifully and develop that soft, airy texture inside. Do not skip it.
Dip the kulche in chole before toasting. This is the step that takes your Peepé Wale Chole Kulche from good to outstanding. Dip the freshly cooked kulche into the chole gravy, let it soak up the masala, then toast it on a hot tawa. That is the Delhi street style finish — and it is absolutely worth it.
Pairing Guide for Peepé Wale Chole Kulche
Hot tawa-toasted kulche are the perfect and only partner for this Peepé Wale Chole Kulche recipe. The soft kulche dipped in chole gravy and toasted on the tawa — that combination is the whole point of this dish. Do not serve the chole with anything else if you are going the full Delhi street food route.
Fresh coriander on top is a must. It adds a brightness and freshness that cuts through the richness of the chole masala. Always finish your Peepé Wale Chole Kulche with a generous sprinkle of freshly chopped coriander just before serving.
A drizzle of ghee takes the whole experience to another level. Whether you add it to the chole or brush it on the tawa while toasting the kulche, ghee brings a richness and aroma that is very much part of the Delhi street food experience.
Sliced raw onion and green chutney on the side are classic accompaniments. The sharp bite of raw onion and the freshness of mint-coriander chutney balance the deep, spiced flavour of the chole beautifully.
A glass of lassi or chaas is the ideal drink to have alongside Peepé Wale Chole Kulche. The cool, slightly sour yogurt drink is a natural contrast to the bold, chatpata spice of the chole and helps settle the meal perfectly.
Frequently Asked Questions About Peepé Wale Chole Kulche
1. Why do we need to soak the chole overnight for Peepé Wale Chole Kulche?
Soaking the chole overnight is essential because it softens the chickpeas from the inside, making them cook faster and more evenly in the pressure cooker. Without proper soaking, the chole will not become fully soft and will not absorb the masala the way they should. For the best Peepé Wale Chole Kulche, always soak your chickpeas overnight — no shortcuts here.
2. Why is tea water used in Peepé Wale Chole Kulche?
Tea water is added to the chole while pressure cooking to give them that deep, dark brownish colour that you see in authentic Delhi-style Peepé Wale Chole Kulche. It also adds a very subtle depth to the flavour of the curry. This is one of the key tricks that makes street-style chole look and taste different from regular homemade ones.
3. Why do we cook the onion paste before adding whole spices?
The onion paste needs to be cooked for 4 to 5 minutes first so that the raw smell of the onion is completely cooked out. If you add the whole spices too early, the onion rawness stays in the dish and affects the final flavour. Getting this step right is what gives Peepé Wale Chole Kulche their well-rounded, deep masala base.
4. How many pressure cooker whistles do the chole need?
For Peepé Wale Chole Kulche, the chole need five whistles — not three or four like regular soaked chickpeas. The reason is that the masala already has tomato in it, which slows down the cooking process. Five whistles ensures the chole are fully soft and have properly absorbed all the spices.
5. Why do we let the kulche dough proof twice?
The kulche dough needs two rounds of proofing — once after making the dough, and once again after rolling it out. The second proof of 15 to 20 minutes allows the kulche to puff up again and develop that beautiful soft, airy, layered texture with the little air pockets inside. This is what gives authentic Peepé Wale Chole Kulche their signature look and texture.
6. What is the purpose of adding kalonji and coriander on the kulche?
Kalonji (nigella seeds) and fresh coriander are pressed onto the rolled kulche before the second proofing and cooking. They add a mild earthy flavour and a classic look that is instantly recognisable as Delhi street style. A little water is applied to help them stick to the surface of the kulche before toasting.
7. How are kulche cooked for Peepé Wale Chole Kulche?
The kulche are cooked on a hot dry tawa with just a splash of water and then covered with a lid. They cook in the steam — no oil, no butter at this stage. Both sides are cooked for one to two minutes on medium flame until the kulche are done all the way through. The final toasting in ghee or dry on the tawa happens after dipping them in the chole gravy.
8. What makes Peepé Wale Chole Kulche different from regular Chole Bhature?
The biggest difference is in how the bread is finished. With Chole Bhature, the bhatura is deep fried. With Peepé Wale Chole Kulche, the kulche are first cooked on a tawa, then dipped directly into the chole gravy, and then toasted again on the tawa. That dipping step soaks the kulche in all the masala and transforms the whole eating experience into something that is very uniquely Delhi street food.
9. Can I make the kulche dough in advance?
Yes, you can make the kulche dough in advance. The dough needs at least one to one and a half hours to rise properly after kneading. Once risen, you knock it back, shape it into small dough balls, and then let it rest again. If you make the dough ahead of time and refrigerate it, take it out and bring it to room temperature before rolling and proofing for the second time.
10. What is the right way to finish and serve Peepé Wale Chole Kulche?
The right way to finish Peepé Wale Chole Kulche is the Delhi street way — dip the freshly cooked kulche straight into the chole gravy so it soaks up all that masala and tari. Then place it on a hot tawa and toast it. Top with freshly chopped coriander and serve hot. This is exactly what the street vendors do and it is what makes this dish so incredibly flavourful and satisfying.