
Protein Se Bhari Soya Bean Sabzi Recipe

45 Mins

5-6 People

5-6 hrs
The Most Protein-Packed Sabzi You're Not Making Yet
Did you know that soyabean has more protein than almost any other plant-based food? That's right — one spoonful of this sabzi is literally packed with protein. I always say, people use soyabean for its oil, or they make soya chunks, but very few people actually make a proper Soyabean Ki Sabzi. And that's the real tragedy, because when you cook it right, it is absolutely delicious.
This is one of those recipes I genuinely love sharing because it's simple, it's healthy, and honestly — tasty galoor. If you go to the gym or you're trying to watch your health, this soyabean sabzi is one of the best things you can add to your plate. I pair it with a crispy Mirch Laccha Paratha and I promise you, it becomes a combination you'll keep coming back to.
Ingredients of Soyabean Ki Sabzi
Soyabean Ki Sabzi
(High-Protein Veg Sabzi)
Portion Servings: 5–6 pax
Preparation Time: 5–6 hours (overnight soak)
Cooking Time: 45 minutes
For Cooking Soyabeans:
- Soyabean – 2 cups
- Salt – 1 tsp
- Water – as required
For Cooking Soyabean Masala:
- Oil – 1 tbsp
- Jeera – 1 tsp
- Onion, chopped – 2 pcs
- Ginger & garlic paste – 1 tbsp
- Tomato puree – 2 pcs
- Green chilli, slit – 2 pcs
- Turmeric powder – ½ tsp
- Red chilli powder – 1 tsp
- Salt – 1 tsp
- Jeera powder – ½ tsp
- Coriander powder – 1 tsp
- Garam masala – ½ tsp
- Splash of water
- Boiled soyabean (from above)
- Kasuri methi – 1 tbsp
- Coriander, chopped – 1 tbsp
For Mirch Laccha Paratha:
- Wheat dough (Atta) – as required
- Oil – as required
- Red chilli powder – a pinch
- Salt – a pinch
- Wheat flour for dusting – as required
- Green chilli, chopped – as required
- Coriander, chopped – as required
Instructions of Soyabean Ki Sabzi
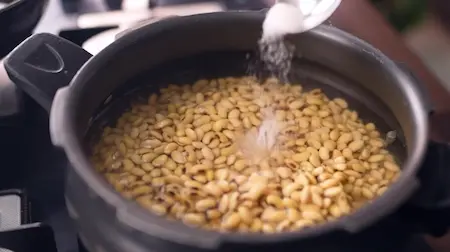
Step 1: Soak & Pressure Cook Soyabeans
Wash and soak the soyabeans overnight in enough water so they are fully hydrated. The next day, transfer them to a pressure cooker. Add salt and water. Cook for about 4 to 5 whistles until the soyabeans are soft but still hold their shape. Open the cooker and press one between your fingers — it should break easily. Drain and keep aside. Remember, if you overcook them they go completely mushy, so 4 to 5 whistles is the sweet spot.
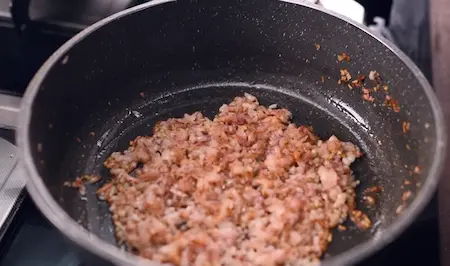
Step 2: Prepare the Onion Masala Base
Heat oil in a pan and add jeera. As soon as it crackles, add the finely chopped onions. No whole spices here — no cloves, no cardamom, no cinnamon — just plain jeera. Sauté the onions on medium flame for 7 to 8 minutes until they turn almost golden brown. The better you roast the onions, the better your masala will be. Be patient here.
Step 3: Add Ginger Garlic Paste
Add ginger-garlic paste to the golden onions and cook for 2 to 3 minutes on medium flame. The raw smell should completely go away before you move to the next step. Keep stirring so it doesn't stick to the bottom. You can also try my massi's trick here — add soaked kasuri methi at this stage while the masala is cooking. It makes the flavour double or triple.
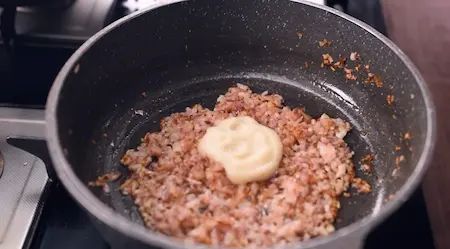
Step 4: Cook Tomato Masala
Add fresh tomato puree and slit green chillies to the pan. Cook on medium flame for 2 to 3 minutes until the puree thickens and the oil starts to separate. The green chillies add a nice kick and freshness to the sabzi — don't skip them.

Step 5: Add Dry Spices
Now add turmeric powder, red chilli powder, salt, jeera powder, coriander powder, and garam masala. Cook the masala properly on low to medium flame. If it starts sticking to the pan, just add a small splash of water — this keeps the spices from burning and helps them cook into the masala properly. The more patiently this masala cooks, the more flavour it gives.

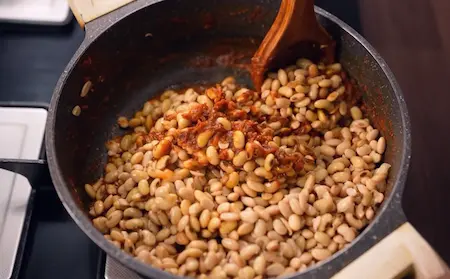
Step 6: Add Soyabeans & Simmer
Add the cooked soyabeans to the masala and mix well so each bean is coated. Add a little water to adjust consistency — keep it slightly thick and "latpata", not watery. Simmer for 7 to 8 minutes so the soyabeans absorb all the masala flavour fully. Finish with kasuri methi crushed between your palms and some freshly chopped coriander on top.
Step 7: Prepare the Dough
In a bowl, take whole wheat flour and add salt. Add water gradually and knead into a soft, smooth dough. Apply a little oil and knead once more for a few seconds. Cover and let it rest for 15 to 20 minutes. This resting time is important — it makes the paratha softer and helps the layers come out better.
Step 8: Shape the Mirch Laccha Paratha
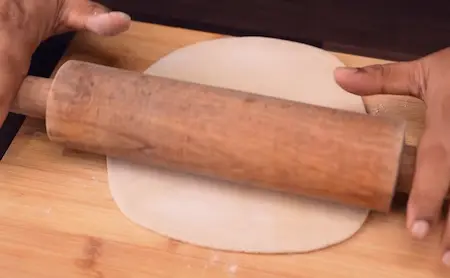
Take a portion of dough and roll it into a thin round disc — the thinner, the better layers you'll get. Apply a light layer of oil all over the surface. Sprinkle dry flour, a pinch of salt, a pinch of red chilli powder, and then spread the chopped green chilli and coriander evenly. Now fold it into thin pleats, just like the pleats of a saree. Roll the pleated strip into a spiral round shape. Dust lightly with flour and roll it out again gently into a medium-thick paratha.

Step 9: Cook the Paratha
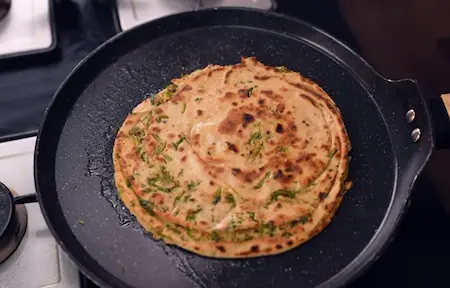
Heat a tawa on medium flame and place the rolled paratha on it. Cook until small bubbles appear, then flip. Apply oil on both sides and press gently while cooking. Cook until it is golden brown, crispy, and you can see the flaky layers opening up beautifully. Don't rush this — a well-cooked paratha takes a little time but is absolutely worth it.
Step 10: Serve Hot
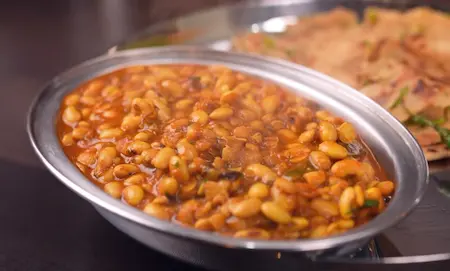
Remove the paratha from the tawa and gently crush it between your palms — this opens up all the flaky layers. Serve hot alongside a generous bowl of thick Soyabean Ki Sabzi and a fresh salad on the side. This combination is full of protein, full of flavour, and honestly one of the best things you can make at home.
About This Soyabean Ki Sabzi Recipe
Let me be honest with you — Soyabean Ki Sabzi is one of those dishes that sounds simple but has a few important things you need to get right. The first and most important thing is soaking. Soyabean is not like rajma where you can sometimes get away without soaking. Soyabean will simply not soften if you skip the overnight soak. I always soak mine overnight, then pressure cook with a little salt and water for 4 to 5 whistles.
Now here's the thing about pressure cooking — you don't want to overcook it. If soyabean gets overcooked, it turns completely mushy and you can't save it. So 4 to 5 whistles is the sweet spot. When you open the cooker, just pinch one and check — it should break easily but still hold its shape.
The masala for this recipe is what I call the "base masala" — it's the same foundation I use for rajma, chhole, and so many other sabzis. Just jeera, onion, ginger-garlic paste, tomato puree, and some simple dry spices. What changes the dish is the ingredient you add at the end. When soyabean goes in, it absorbs all that masala and becomes the star. That's the magic of a good base masala.
One tip I got from my massi — who makes the most incredible kadhi and rajma — is to soak kasuri methi before you add it into the masala. It sounds like a tiny thing but the flavour it adds is double, triple. Try it. You won't regret it.
And to go with this sabzi, I make a Mirch Laccha Paratha. This paratha is layered, crispy, and has chopped green chilli and coriander folded into it like pleats of a saree. If you use a mild green chilli, a pinch of salt and red chilli, this paratha with chai can honestly be your daily breakfast. That's my guarantee.
Cooking Tips for Soyabean Ki Sabzi
1. Never Skip the Overnight Soak
Soyabean is not like other legumes. It will not soften without proper soaking. Always soak it overnight in enough water so it is fully hydrated before you pressure cook it.
2. Don't Overcook the Soyabean
4 to 5 whistles is enough. If you cook it for too long, it goes completely mushy. After opening the cooker, test one — it should break when you press it with your fingers but not fall apart.
3. Be Patient with the Masala
The slower and more patiently you cook the masala, the better it tastes. Onions need 7 to 8 minutes to turn golden brown. Ginger-garlic paste needs another 2 to 3 minutes. Tomato puree needs time too. Don't rush this part.
4. Use a Splash of Water with Dry Spices
When you add dry spices like turmeric, red chilli, and coriander powder, they can burn very quickly. A small splash of water keeps them from sticking to the pan and helps them cook properly into the masala.
5. Soak Your Kasuri Methi
This is my massi's trick — soak the kasuri methi before adding it to the masala. It doubles the flavour. Whether you're making rajma, chhole, or this soyabean sabzi, this one small step makes a big difference.
6. Keep the Gravy Slightly Thick
This sabzi doesn't need to be watery. Keep it "latpata" — slightly thick and coating. Add only a little water when simmering so the soyabean absorbs the masala fully.
7. Roll the Paratha Thin for Best Layers
For the mirch paratha, the thinner you roll the disc before folding, the better the layers will be. The key is to fold it like pleats of a saree — even and tight — before rolling it into a spiral and then rolling it out again.
Pairing Guide for Soyabean Ki Sabzi
With Mirch Laccha Paratha
This is the best combination. The crispy, flaky, spiced paratha pairs perfectly with the thick and flavourful soyabean sabzi. The layers of the paratha soak up the masala beautifully. This is what I always serve together.
With Chai
If you make the mirch paratha with a mild green chilli, it becomes a perfect breakfast with chai. I genuinely believe this can be your everyday morning meal. Simple, filling, and so good.
With Plain Rice or Jeera Rice
The thick masala of Soyabean Ki Sabzi also pairs really well with steamed rice or jeera rice. It's like a dal-chawal kind of comfort but with much more protein.
With Raita or Curd
A simple boondi raita or plain curd on the side cools down the spice from the green chillies and balances the whole meal really nicely.
With a Fresh Salad
Sliced onions, cucumber, and a squeeze of lemon on the side is a classic addition. It adds freshness and crunch to a warm, heavy sabzi meal.
For Gym-Goers and Health-Conscious People
Soyabean is one of the richest sources of plant-based protein. If you're working out or watching your nutrition, pair this sabzi with whole wheat paratha and a side of salad for a complete, balanced, high-protein meal.
Frequently Asked Questions About Soyabean Ki Sabzi
1. Why do we need to soak soyabean overnight before cooking?
Soyabean is a very dense legume and will simply not soften if you don't soak it. Unlike rajma, which might sometimes get cooked without soaking, soyabean won't give in without that overnight soak in water. So please don't skip this step if you want your Soyabean Ki Sabzi to turn out properly.
2. How many whistles do I need to pressure cook the soyabean?
4 to 5 whistles is the right amount. After opening the cooker, press one soyabean with your fingers — it should break easily. If it's still hard, give it one or two more whistles. Don't go too far though, because overcooked soyabean turns completely mushy and you can't fix that.
3. Can I use soya chunks instead of whole soyabean for this recipe?
This recipe is specifically for whole soyabean, not soya chunks. The texture and the way whole soyabean absorbs the masala is very different from chunks. I always say — soyabean ka sirf tel nahi banta, soyabean ki sabzi bhi banti hai, and that's the real version I want you to try.
4. What makes Soyabean Ki Sabzi healthy?
Soyabean is one of the richest sources of plant-based protein. It has more protein than most other vegetables or legumes. If you go to the gym or you're watching your health, this Soyabean Ki Sabzi is genuinely one of the best things you can add to your diet. It's filling, nutritious, and actually very tasty.
5. What spices go into the masala for Soyabean Ki Sabzi?
The masala is actually very simple — turmeric powder, red chilli powder, salt, jeera powder, and coriander powder. That's it. No fancy whole spices, no cloves or cardamom. Just plain jeera in the oil and then simple dry masala. The secret is cooking each element slowly and patiently.
6. Why do you add a splash of water when cooking the dry spices?
Dry spices like turmeric and red chilli powder can burn very quickly if the pan is hot. Adding a small splash of water keeps them from sticking and burning, and it helps them blend into the masala properly. This is a simple trick but it makes a real difference to the final taste of Soyabean Ki Sabzi.
7. What is the trick with kasuri methi that you mentioned?
My massi — who makes amazing kadhi and rajma — taught me this. She soaks kasuri methi in water before adding it to the masala. When you add soaked kasuri methi while cooking, the flavour it gives is double or even triple what you'd get from just sprinkling it dry. Try it in your Soyabean Ki Sabzi and you'll see the difference immediately.
8. How do I make the Mirch Laccha Paratha layers come out properly?
The key is to roll the dough as thin as possible before you start folding. Then rub oil, a pinch of salt, and red chilli powder on it. Sprinkle dry flour — this is what creates the layers. Then add your green chilli and coriander, fold it into pleats like a saree, roll it into a spiral, and then roll it out again gently. Cook on a hot tawa with oil on both sides until golden and crispy.
9. Can Mirch Laccha Paratha be made less spicy for everyday breakfast?
Absolutely. If you use a non-spicy green chilli, add just a pinch of salt and a little red chilli powder, this paratha becomes a daily breakfast dish. Pair it with chai and you have a complete morning meal. That is my personal guarantee — it's that good.
10. What consistency should Soyabean Ki Sabzi be?
It should not be watery like a soup. It should be what we call "latpata" — slightly thick, slightly saucy, where the masala coats the soyabean nicely. Don't add too much water while simmering. Let it cook for 7 to 8 minutes so the soyabean absorbs all the masala flavour and the whole Soyabean Ki Sabzi comes together beautifully.